
During this "Watercolor Week," I thought I would share just two of the 5-minute demo segments (Tortoise and Zouave) from the new watercolor video "Watercolor in the Wild." If you have purchased the DVD or download, thanks!—and don't worry: I'll hold back the four remaining longer segments (Miniature Horse, Carriage House, Greenhouse, and Churchyard)—which actually translates to more than 3/4 of the running time that you can see only if you purchase the video.
Sharing these sample clips on the blog gives me a chance to amplify them with closeups, and it gives everyone an opportunity to comment and ask questions so that these blog posts can be more interactive.

For example, yesterday in the comments after the art supply list, Irene mentioned that you can get woodless watercolor pigment sticks or crayons, something I didn't discuss in the video. Thanks, Irene. As she indicated, Derwent makes Aquatone Woodless Pencils
These are shorter than the colored pencils and a bit softer, like crayons. Lyra's

Whether you use the wood pencil or the crayon version of these water-soluble drawing tools, they offer three big advantages over a pure watercolor rendering.
First off, they're a fast way to get texture. I used the colored pencil dry over the first base layer of watercolor.
Secondly, as you can see in the little round scales above, you can add water later to soften or blend the pencil. That's how I made those smooth dots: just a touch of water on each. And I used the water brush to group them together into a shadow, as along the right side of the form.


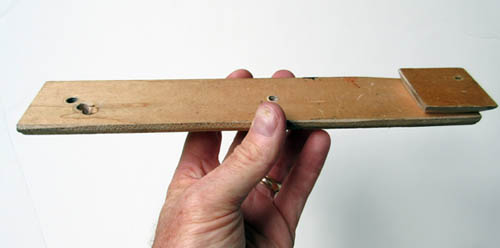
Some of you asked how I shot the video while doing the drawing. For the tortoise segment, I used one video camera and one tripod. I held the camera off to the side with a "camera extension bar" that I made out of 1/4 inch plywood. This holds the camera over my lap without getting in the way too much. I also used this for shooting the miniature horse sequence.
To learn more about the 72-minute video "Watercolor in the Wild":
HD download: (Credit Card)
HD download: (Paypal) buy
DVD: (NTSC, Region 1)
GJ Blog Post about Watercolor Materials